A while ago I wrote about my attempt to find a KVM-style switch that could handle switching all my USB devices and my 2 monitors between my PC (outputting HDMI + DisplayPort) and my work laptop (connected only via USB-C), and how I eventually found a device that I liked.
I also wrote about an annoying display glitch that came up in conjunction with this switching setup that I’d created (but only with my new, bigger monitors, for reasons that still aren’t clear).
This was all more or less settled – the switching was working (most of the time – every once in a blue moon I’d have trouble) and the display glitch was manageable… until just the other day, when one of my bunnies (I’m not sure which one) took a tiny little nibble on the cable to the remote button for the KVM.
This little nibble was just enough to cut the tiny wires inside the cable such that the button no longer worked reliably, effectively making it impossible for me to switch back to my PC1. Thanks, buns!
So, now I had a reason to find a new KVM – and, coincidentally, in the meantime I’d stumbled across some other, possibly better options. So now seemed like the time to give one of them a try.
The device I ended up going with is called the iDock C10, from a company called AV Access. It was a little bit pricier than the Anker switch I’d gotten before, but not by much, and it offered some features that made it very appealing to me.
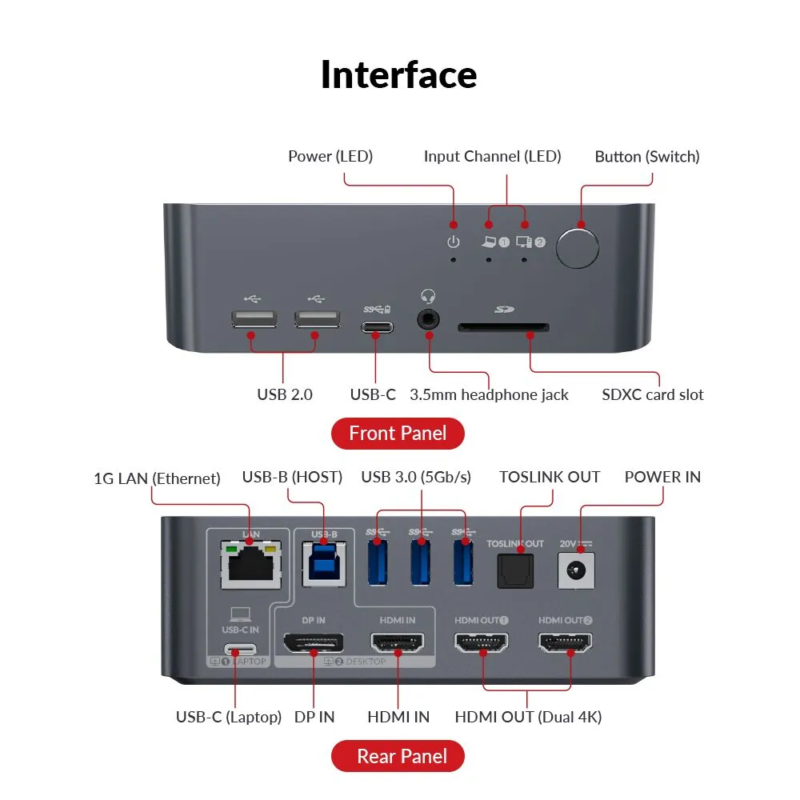
On the face of it, the iDock C10 does all of the same core things the Anker 553 did – it connects to a laptop via USB-C and a computer using USB and HDMI + DisplayPort, and supports 2 monitors. However, there are a couple of major differences:
- The iDock C10 outputs via HDMI to both monitors – unlike the Anker switch, which acted as a passthrough when switched to the PC and thus had the same HDMI + DisplayPort outputs as it did inputs. This potentially meant that the weird display glitch I’d had with my monitor that was connected over DisplayPort might not be an issue.
- The iDock C10 has EDID emulation – which means that instead of each computer having the displays disconnected when you switch, it effectively “pretends” that the monitors are still connected to each computer (even when they aren’t active). This means each computer doesn’t have to re-configure the displays every time you switch.
Both of these differences were important to me, because 1 would potentially solve my display glitch, and 2 would make it easier when switching between computers (no more icons re-arranging or windows re-sizing).
The iDock C10 has some other nice features as well which the Anker 553 lacked – things like a gigabit Ethernet port (though this only feeds into the laptop), Toslink optical audio out, and an SD-card reader slot. While I don’t use the first two, the last one is actually handy for me – it saves me from having to use a dongle when I download photos from my camera.
The one thing the iDock C10 lacks which the Anker 553 had is the remote button for switching. I think the intended use case is to have the iDock C10 on your desk, but I wanted to keep my clean minimal-cables desk, so I kept it mounted under my desk. I did move the mounting point over to the side of my desk, however, so I could reach the button without too much trouble – it is almost in the same place as where I had the remote switch, so it’s not too bad – though I did have to extend a few cables to make them reach the new mounting location.
I’ve had the iDock C10 for a few days now, and I am happy to report that it has resolved all of the issues I had previously:
- When I wake up my desktop from idle, both monitors come back to life without issue – no more having the DisplayPort monitor not wake up most of the time (because it is technically not connected via DP anymore – it is connected to the iDock C10 via HDMI).
- I’ve not had any issues with my computer or laptop not switching all the inputs – the displays switch without issue and all the USB devices switch without trouble as well. It seems to handle this switching much better – the Anker used to very rarely have trouble, I think due to the fact that both of my monitors have USB hubs in them.
- When switching back and forth between computers, my desktop stays exactly as it was – no more windows getting resized, no more background images getting confused which monitor they should be on – it all just works as you’d expect it to.
So, overall I’m quite happy with this device, and I finally feel like I have the perfect switching setup. I do need to tidy up some cables under my desk – I was in a bit of a hurry to get it all re-connected – but other than that, it seems to be working just as it should.
That said, I am a little frustrated that it took this much effort to get it working – what with the limited information on things like DisplayPort alt modes, Single-Stream Transport (SST) vs Multi-Stream Transport (MST), USB hubs and switches, and the compatibility issues that arise from all of this are poorly documented and maddeningly confusing. But… at least I got it working, and hopefully this helps someone else who might be in the same situation.
- As it turns out, there was actually another button on the KVM box itself, which I had forgotten about and didn’t notice because of where I’d mounted it under my desk. So strictly speaking I didn’t need to buy a new KVM, but in the end it all worked out for the best, so… ↩︎